


/https%3A%2F%2Fprofilepics.canalblog.com%2Fprofilepics%2F1%2F9%2F191987.jpg)
A "Pissaladière" for the Daring Bakers/Une Pissaladière pour les Daring Bakers

A particularly
moving challenge this month, since one of the hostesses, Sherry Cermak,
tragically passed away last july, from a massive and sudden heart
attack. Even though I did not know her personnally, I was touched . Hard to explain, but, with the Daring Bakers, I have the
feeling of belonging to a group of great people sharing the same
passion about food. And the loss of one person from this group sucks.
Courageous Rosa had to handle the challenge al by herself, and in those
sad circumstances, I can imagine it has not been an easy task. Brava
Rosa.
For the second time in a row, the challenge was a savory recipe. A pizza
dough, sauce and toppings of our choice. Wow, so much freedom ! I don't know if you
have noticed, but I like to mark my french identity whenever I can. So
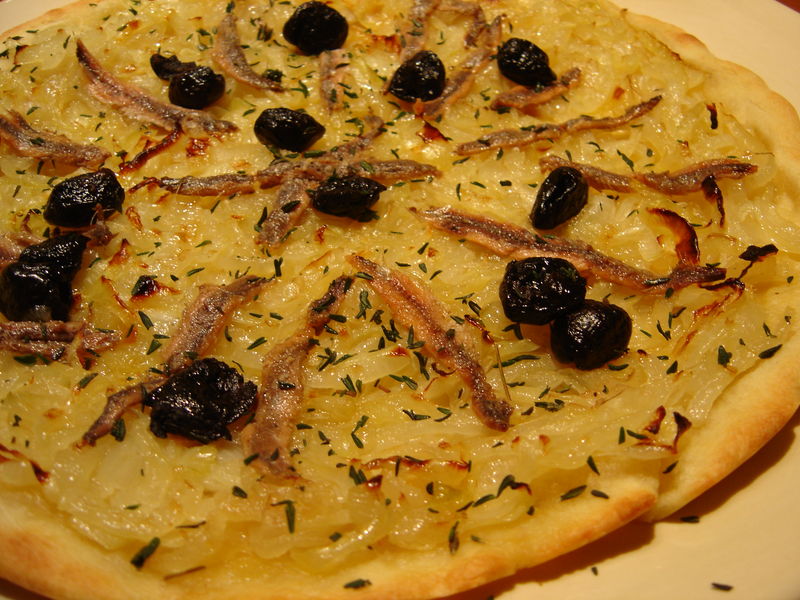
it was no surprise I chose to make our national pizza : pissaladière. A
recipe from the South of France, with plenty of onions, and some
anchovies and niçoises olives.
Un défi particulièrement émouvant ce mois-ci puisque l'une des hôtes supposées de ce mois, Sherry Cermak, est brusquement décédée d'une crise cardiaque en juillet dernier. Même si je ne la connaissais pas personnellement, cette nouvelle m'a touchée, car entre Daring Bakers, il y a une sorte de connivence, d'appartenance à un groupe soudé...La courageuse Rosa a donc dû faire face seule et dans un contexte aussi triste, j'imagine que cela n'a pas du être facile tous les jours...Bravo à toi Rosa.
Pour le second mois consécutif, le choix s'est porté sur une recette salée, et pas n'importe laquelle : une pâte à pizza ! Sauce et garniture au choix. Wow, les DB nous avaient peu habitués à tant de latitude...Mon choix s'est porté sur la pissaladière...tout simplement parce que si je ne suis pas fan de pizza "traditionnelle", en revanche je fond pour les pizzas blanches (sans sauce tomate) de toutes sortes. Les oignons fondants, les anchois bien salés et les olives noires ont achevé de me convaincre. Ce sera une pissaladière ou ce ne sera pas !!
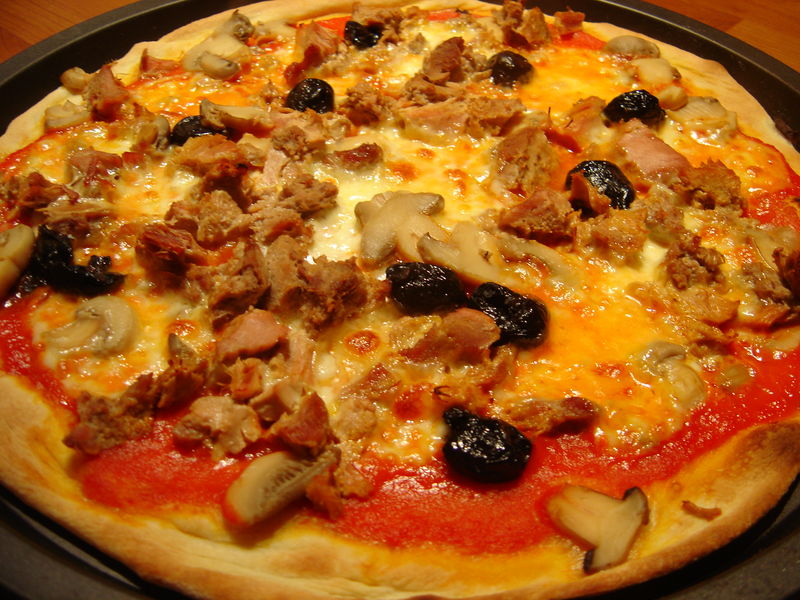
For my kids, I made one with tomato sauce, tuna, mozzarella cheese, mushrooms and black olives.
~ Pissaladière on a Basic Pizza Dough~
Original recipe taken from “The Bread Baker’s Apprentice” by Peter Reinhart.
Makes 6 pizza crusts (about 9-12 inches/23-30 cm in diameter).
Ingredients:
4 1/2 Cups (20 1/4 ounces/607.5 g) Unbleached high-gluten (%14) bread flour or all purpose flour, chilled -
1 3/4 Tsp Salt
1 Tsp Instant yeast - FOR GF use 2 tsp
1/4 Cup (2 ounces/60g) Olive oil or vegetable oil (both optional, but it’s better with)
1 3/4 Cups (14 ounces/420g or 420ml) Water, ice cold (40° F/4.5° C)
1 Tb sugar - FOR GF use agave syrup
Semolina/durum flour or cornmeal for dusting
The toppings :
2.5 lb onions
1 cup of olive oil
12 salted anchovies
1 tsp granulated sugar
1/3 cup niçoise (black) olives
Day One
Mix together the flour, salt and instant yeast in a big bowl (or in the bowl of your stand mixer).
Add the oil, sugar and cold water and mix well (with the help of a large wooden spoon or with the paddle attachment, on low speed) in order to form a sticky ball of dough. On a clean surface, knead for about 5-7 minutes, until the dough is smooth and the ingredients are homogeneously distributed. If it is too wet, add a little flour (not too much, though) and if it is too dry add 1 or 2 teaspoons extra water.
NOTE: If you are using an electric mixer, switch to the dough hook and mix on medium speed for the same amount of time.The dough should clear the sides of the bowl but stick to the bottom of the bowl. If the dough is too wet, sprinkle in a little more flour, so that it clears the sides. If, on the contrary, it clears the bottom of the bowl, dribble in a teaspoon or two of cold water.
The finished dough should be springy, elastic, and sticky, not just tacky, and register 50°-55° F/10°-13° C.
Flour a work surface or counter. Line a jelly pan with baking paper/parchment. Lightly oil the paper.
With the help of a metal or plastic dough scraper, cut the dough into 6 equal pieces (or larger if you want to make larger pizzas).
NOTE: To avoid the dough from sticking to the scraper, dip the scraper into water between cuts.
Sprinkle some flour over the dough. Make sure your hands are dry and then flour them. Gently round each piece into a ball.
NOTE: If the dough sticks to your hands, then dip your hands into the flour again.
Transfer the dough balls to the lined jelly pan and mist them generously with spray oil. Slip the pan into plastic bag or enclose in plastic food wrap.
Put the pan into the refrigerator and let the dough rest overnight or for up to thee days.
NOTE: You can store the dough balls in a zippered freezer bag if you want to save some of the dough for any future baking. In that case, pour some oil(a few tablespooons only) in a medium bowl and dip each dough ball into the oil, so that it is completely covered in oil. Then put each ball into a separate bag. Store the bags in the freezer for no longer than 3 months. The day before you plan to make pizza, remember to transfer the dough balls from the freezer to the refrigerator.
Day Two
On the day you plan to eat pizza, exactly 2 hours before you make it, remove the desired number of dough balls from the refrigerator. Dust the counter with flour and spray lightly with oil. Place the dough balls on a floured surface and sprinkle them with flour. Dust your hands with flour and delicately press the dough into disks about 1/2 inch/1.3 cm thick and 5 inches/12.7 cm in diameter. Sprinkle with flour and mist with oil. Loosely cover the dough rounds with plastic wrap and then allow to rest for 2 hours.
Meanwhile, make the toppings :
Peel and quarter the onions. Heat olive oil in a skillet over medium heat. Cook the onions in olive oil, they have to "melt" but not get golden.Rinse anchovies, and saok in a glass of cold water. Sprinkle cooked onions with sugar. Mix well. At least 45 minutes before making the pizza, place a baking stone on the lower third of the oven. Preheat the oven as hot as possible (500° F/260° C).
NOTE: If you do not have a baking stone, then use the back of a jelly pan. Do not preheat the pan.
Generously sprinkle the back of a jelly pan with semolina/durum flour or cornmeal. Flour your hands (palms, backs and knuckles). Take 1 piece of dough by lifting it with a pastry scraper. Lay the dough across your fists in a very delicate way and carefully stretch it by bouncing it in a circular motion on your hands, and by giving it a little stretch with each bounce. Once the dough has expanded outward, move to a full toss.
NOTE: Make only one pizza at a time.
During the tossing process, if the dough tends to stick to your hands, lay it down on the floured counter and reflour your hands, then continue the tossing and shaping.
In case you would be having trouble tossing the dough or if the dough never wants to expand and always springs back, let it rest for approximately 5-20 minutes in order for the gluten to relax fully,then try again.
You can also resort to using a rolling pin, although it isn’t as effective as the toss method.
When the dough has the shape you want (about 9-12 inches/23-30 cm in diameter - for a 6 ounces/180g piece of dough), place it on the back of the jelly pan, making sure there is enough semolina/durum flour or cornmeal to allow it to slide and not stick to the pan.
Lightly top it with the onion topping. Pat dry the anchovy fillets and arrande them over the onions. Decorate with the nicoise olives.
Slide the garnished pizza onto the stone in the oven or bake directly on the jelly pan. Close the door and bake for abour 10-12 minutes.
NOTE: After 2 minutes baking, take a peek. For an even baking, rotate 180°.
If the top gets done before the bottom, you will need to move the stone or jelly pane to a lower shelf before the next round. On the contrary, if the bottom crisps before the cheese caramelizes, then you will need to raise the stone or jelly.
Take the pizza out of the oven and transfer it to a cutting board or your plate. In order to allow the cheese to set a little, wait 3-5 minutes before slicing or serving.
~ Pissaladière sur une Pâte à Pizza classique ~
Recette de “The Bread Baker’s Apprentice” de Peter Reinhart.
Pour 6 pâtes à Pizza (23-30 cm de diamètre).
Ingrédients:
600g farine ordinaire, froide (mettez-la au frais pendant 2 heures avant utilisation)
1 3/4 cc de sel
1 cc de levure sèche
60g d'huile d'olive
42cl d'eau glacée (4.5° C)
1 Cs de sucre
semoule dure
Garniture
1.250 kg d'oignons
1 verre d'huile d'olive
12 anchois au sel
1 cuillerée à café de sucre en poudre
60g de petites olives de Nice
Jour Un
Mélangez ensemble la farine, le sel et la levure dans un saladier ou le bol de votre robot.
Ajoutez l'huile, le sucre et l'eau glacée et mélangez bien (sur votre robot, 5 à 7 minutes à puissance moyenne).La pâte doit se détacher des parois mais être collante au fond du saladier ou du bol.
Farinez un plan de travail et recouvrez une plaque à patisserie de papier sulfurisé.Huilez légèrement le papier.
Travaillez la pâte quelques minutes sur le plan de travail en rajoutant de la farine si ellest trop collante ou de l'eau glacée si elle est trop sèche.Coupez 6 portions égales de pâte à pizza
Saupoudrez un peu de farine sur les portions de pâte et roulez chacune en boule.Farinez vos mains pour plus de facilité.
Transférez les boules de pâte vers la plaque à pâtisserie, recouvrez les d'huile et recouvrez la plaque de film alimentaire.
Mettez la plaque au frais pendant au moins une nuit et jusqu'à trois jours avant usage.
Jour Deux
Trois heures avant de déguster la pizza, sortez le nombre désiré de boules du frigo. Farinez et huilez légèrement un plan de travail. Farinez également la boule de pâte, ainsi que vos mains.Pressez afin de former un disque d'environ 1.5 cm d'épaisseur et 13 cm de diamètre. Saupoudrez d'un peu de farine et vaporisez d' huile.Recouvrez de façon lâche de film alimentaire et laissez reposer 2 heures.
Pendant le temps de levée, préparez la garniture :
Epluchez et coupez les oignons en fins quartiers. Chauffez l'huile d'olive dans une petite cocotte, versez-y les oignons et laissez-les cuire sans colorer, en les remuant avec une cuillère de bois. En fin de cuisson, ils doivent être fondants sans être dorés.
Lavez les anchois, levez-en les filets et mettez-les à tremper à l'eau fraîche.
Saupoudrez les oignons avec la pincée de sucre, mélangez.
Au moins 45 minutes avant de faire la pizza, préchauffez le four à 260°C.
Recouvrez généreusement l'envers d'une plaque à pâtisserie de semoule dure.Farinez vos mains (paumes, doigts, poignets) et prenez un cercle de pâte.Laissez-la descendre sur vos poignets et étirez-la délicatement par des mouvements rotatifs successifs. Voir cette vidéo.
Si la pâte colle, farinez vos mains et poignets.
Quand la pâte atteint 23 à 30 cm de diamètre, placez-la sur le dos de la plaque à patisserie recouverte de semoule dure afin que la pâte ne colle pas et puisse glisser facilement après cuisson.
Recouvrez de la garniture aux oignons. Epongez les filets d'anchois, disposez-les sur les oignons. Décorez avec les petites olives.
Faites cuire 10 à 12 minutes.
Retirez du four, faites glisser la pizza sur une planche à découper ou une grande assiette de service.Attendez 5 à 6 minutes avant de découper.


/http%3A%2F%2Fstorage.canalblog.com%2F05%2F48%2F224841%2F100305527_o.jpg)
/https%3A%2F%2Fstorage.canalblog.com%2F90%2F13%2F224841%2F51199746_o.jpg)
/https%3A%2F%2Fstorage.canalblog.com%2F77%2F17%2F224841%2F99141456_o.jpg)
/https%3A%2F%2Fstorage.canalblog.com%2F73%2F66%2F224841%2F40723272_o.jpg)